Friday 30 November 2012

Lifestyle Block Magazine


I found this magazine in the supermarket one day.  I bought one copy and while there were a couple of articles that interested me in it, I was rather underwhelmed.  I left it for about six months and the cover of the latest issue caught my eye.

Since then, I've fallen in love with this magazine.  It’s become my must-have purchase once a month.  I read through the articles that I really want to read first and then go through another time reading all the bits that I skipped.  Then I usually go through a third time to see if I’ve missed anything.  Then I wait for 3 weeks for the next one!!


The articles are sensible, practical and cover both commercial farming applications and the small mostly clueless townie trying to live the country life (like us).  For the most part they walk this centre line without being condescending to the clueless or so filled with unexplained jargon that only the big commercial farmer would understand it.  I say ‘unexplained jargon’ because when the jargon is used, the meaning is usually also explained - very handy for those of us who are learning the whole new language that is livestock, pasture and rural life.

There are feature articles and regular columns and I’ve come to love both.  The tips and tricks that I’ve learned for many things have been extremely handy.  I’ve picked up things to do some more research on (pelton wheels generating electricity from the water in your drains!!) and read stories of people who’ve managed to turn their little slice of land into a success story.  There are also the things that haven’t worked for some people, the mistakes they’ve made that they’re sharing with others so they don’t fall into the same traps.  I learned the laws around homekill and the truth about the much propaganda-ised food bill.

I love Murray Grimwood’s column “The Good Life”, this guy is not afraid to say he cocked something up and explain how he’s thinking of fixing it.  He’s smart, passionate, resourceful and a delight to read.  He also has a blog here.

What has really impressed me is that for the third time, there will be something that I’m considering and researching.  I spent several hours going through my collection looking for the little snippets that have hinted toward this thing I’m thinking about.  When I’m just about there, the next issue will have an article that features my latest “thing” and makes it all clear.

This month's one was about planting herbs that are beneficial to your livestock.  There is a new column (well it’s been going for probably about 4 months) about building your block from scratch and making the effort to get things right in the design.  It’s written by a block/landscape designer.  It mentioned herbal leys and there were a couple of herbs listed that are good to have growing in a junction planter (those triangle fenced off bits you see here and there in paddocks) and their benefits for your stock.  I’d also heard a few bits from others who have done this sort of thing before.  I listen to everyone and then sift the useful from the not-so-much.  Imagine my delight when the feature on the cover was “How herbs can improve your block” and covered not just herbs for big livestock but also herbs for poultry!  That covered something I’d been thinking about in a totally different area.

I’m sure the editor or the writers have some gift for knowing what I need to be reading right now.  Or maybe, it’s a seasonal thing - something that most of us are thinking about at these times.  Either way, I thank them for it and long may it last!

Grey Water Vege Garden


One of the problems I have with growing veges or any plants for that matter is that I’m hopeless when it comes to watering them.  I have the best intentions but I’ll get sidetracked and forget to water them.  I did okay in the tunnel house last year, shame we had other issues there.  My house plants are often fading and limp before I notice and give them some more water, although it’s not often I actually kill them.

My grey water vege garden.  A work in progress.
This is never going to work if we really want to be self-sufficient and grow all of our own food.  I had to think of other ways to cover my negligence in the water area.  “Meaning to do it better” has been my thing for about 10 years and hasn’t worked yet, we needed a backup plan.

We found a pipe that runs from the rainwater downpipes, under the driveway and over to a slight slope in the paddock next to the house that faces northeast.  Perfect spot for a garden!  The start of the pipe, well at least one of them, is next to the drains from our ensuite.  Running into this drain is the washing machine, our shower, bath and basin.  It was really quite easy to disconnect this drain from the sewer lines and hook it up to the pipe with the rain water still going there as well.

So I started to build a grey water garden.  I started with an old concrete laundry tub I’d found in a paddock.  It had holes drilled into the bottom, so I figure it had been used for a planter at some time already.  I lined the hole I made under the tub with polythene and sat the tub on bricks with stones.  I also ran a piece of pipe I found lying around from the plughole down the hill a little (after drilling holes in the pipe).

A bathtub potato planter.
We had found a roll of stuff - the weave seems too big for weedmat but too small for windbreak - not sure what it’s supposed to be - I put two layers on the bottom, covered them with small stones then two more layers of this weedmat windbreak stuff.  One bag of potting mix and I was ready to plant.  I put a cherry tomato plant and several bulbs of garlic in this planter. 

Below, running down the hill I ran more polythene, a layer of stones and this time the soil was mostly our local clay.  The pipe from the tub runs down the middle and I planted onions around it.  I bought a pot of Egyptian walking onions - apparently the “flowers” are small bulbs that when they get big enough will cause the stem to bend down and root where they land.  The onions are perfectly edible  too.  But I’ve also got the normal brown onions as well.

My hubby wanted to use one of the bathtubs lying around for growing spuds, so I followed the same process with weedmat/windbreak stuff and stones.  I put in some of the soil I’d dug up to fit the tub and planted about 5 seed spuds.  My next problem though was how to get water from the pipe to the bathtub.
A bathtub full of spuds with celery, broccoli and silver beet behind it.

When we’d been changing our drain over to this line, we discovered that the drain outside the sleepout didn’t have anything running into it.  Maybe a previous owner had planned to put a kitchen sink in there at some stage (which makes sense given that there is a kitchen cupboard unit inside at the same spot) but we had no such plans.  Hubby disconnected the pipe running to this drain and capped the sewer line it was attached to.  I now had a gully trap and about 5 metres of pipe.

A little rearranging of my concrete tub and we fitted the gully trap behind it and Master Fourteen dug a trench for the pipe.  I dug down the soil on the slope below the pipe and lined it with polythene.  A 2 inch layer of soil and I planted some celery, broccoli and silver beet.  The idea is that the excess water will run down to the bathtub.

A bathtub planter with carrots, radishes and parsnips.
Hubby was buying some bioblend for the tunnel house so I appropriated enough to fill another bathtub and sowed seed for carrots, parsnips and radishes.  This mix is one my Dad taught me many years ago.  They take different amounts of time to come ready so the theory is that they’ll be self-thinning.  I also used some to top up the soil for the celery etc and by this time the spuds were growing quite nicely so I added more soil to that bathtub too.

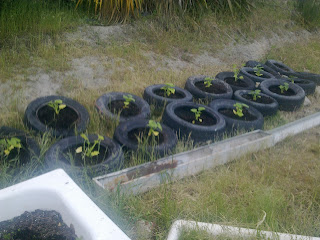
After that I was given 14 pumpkin plants, so I hauled tyres from around the place and filled them with more bioblend and planted them out.  I haven’t sorted their water yet, we have some plans involving another length of pipe, irrigation hose connectors and some of the irrigation bits I’ve found around the place, but for now, I’m filling buckets to water them.  I also have 3 spare tyres (because I miscounted the number of plants) so I’m waiting for my cucumbers that I started from seed and are currently on the windowsill in the kitchen to get big enough for transplanting.

14 pumpkin plants growing in tyres.
The bonus for me is that all we’ve bought for this is some bioblend (at about $30 for a trailer load) and a few plants.  Most I’ve started from seed, but the odd one has been a cheap tray of vege plants from the garden centre.  It all seems to be growing well, despite having been dug up by a puppy, crapped in by cats and scratched over by chooks.  All the bits were stuff that we had lying around here.  Stuff that was left behind or left over from other ventures. 

The bioblend is supposed to be a gap-filler.  I’ve started to set up what I hope will be a worm farm.  An article on this in the Lifestyle Block magazine inspired me to use half the tunnel house for worm-farming.  I’m currently shifting mountains of pig, chook and cow poo into it.

This is what self-sufficiency is supposed to be about.

Thursday 29 November 2012

Herbal Creams and Ointments


 One of the things that I’m always doing at this time of year is making creams.


It’s a simple recipe that I learned when studying at the Canterbury College of Natural Medicine.  It’s based on Galen’s cold cream and has been around for a couple of thousand years.

Herbal Cream Recipe:

60 ml oil
10g beeswax
10ml herbal infusion

Place oil and beeswax in the top of a double boiler or in a bowl in a pan of water.  Gently heat until beeswax is melted.  Remove from heat and add herbal infusion. Beat until thick.
Comfrey, lemon balm and calendula infusing in oil.

A preservative such as tincture of benzoin or vitamin e can be added.


I found that this recipe needed the preservative.  It goes mouldy quite easily.  So (being me) I rearranged it slightly.

I make a warm infusion of my chosen herbs in the oil first and remove the liquid infusion.  It means that it takes a lot longer to make creams, but the result is worth it and they seem to keep forever - even with the lids half off the way Miss Seven seems to always leave them.

To make a warm oil infusion:
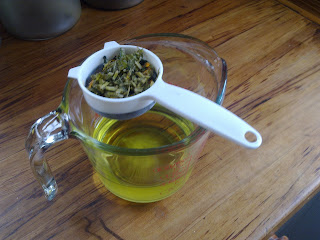
Heat oil in the top of a double boiler, or in a bowl on a pan of water.  Don’t let the water boil, a gentle simmer is enough.  Chop or grind your herbs and add them to the oil.  Leave them infusing for at least an hour.  When it’s ready, the herbs will seem used up.  Some will seem crunchy and others limp and faded.  Strain carefully through cloth.

To finish the cream, add beeswax, dissolve and beat.
Straining herbs out of infused oil.

My favourite herbs to use for this cream are comfrey, lemon balm and calendula.  I make this for eczema and psoriasis as both Hubby and Miss Seven suffer from this kind of skin disorder.  It works a charm for both of them.  Another good one is to use plantain and lavender for insect bites and stings.  Chickweed can be added to this to ease any itching.  I’ve also made a sage and garlic cream for athlete’s foot.  It worked but made the user smell like roast chicken.

The choice of oils depends on what you want to use.
  Olive oil is good for your skin, but the cream is quite heavy and will sit on the skin for a while - this isn’t always a bad thing.  Olive oil is also becoming quite expensive.
  Apricot Kernel Oil or Almond Oil are both great for your skin, light and easily absorbed, but expensive and no good for anyone with nut allergies.
  Grapeseed Oil is cheap and while it’s not as light as Apricot or Almond oils it’s not as heavy as Olive oil.  It can add a yellow tint to your cream, but this isn’t noticeable once it’s on your skin.
  Any oil that is cold-pressed is usually cold-pressed because it changes when heated. In many cases the molecular structure of the oil breaks down and forms plastic polymers which is no good for your cream (or eating).

Wax melting in infused oil.
If you want to use essential oils instead of herbs, they should be added during the beating, otherwise the heat will cause them to evaporate leaving a pretty scent but no active constituents and therefore no actual use.  Be careful in selecting essential oils - no more than 2 or 3 to a cream and 5 drops is the most I would recommend adding to a mix of this size.  Too many different essential oils creates confusion in the cream and too much of any can be detrimental to your skin.  As your skin is oil based, attempts to wash off an overpowering or irritating essential oil with soap and water will only draw it deeper into your skin.  If you want to remove an essential oil, pour a carrier oil like olive oil over and then wipe it off with a paper towel.

Ointments are creams that sit on the surface of your skin and are not absorbed into it.  An olive oil based cream is halfway there, but it will soak in after a while.  They are good for nappy rash and situations where your skin is already irritated.

Herbal Ointment Recipe:

Petroleum jelly (vaseline) or soft parafin wax
Dried herbs

Beating the cream - this is starting to set.
Heat the jelly or wax with herbs in the same manner as a cream.  When the herbs are crispy and used up it is ready.  Strain and pour into container.

My Little Tips and Tricks

Less is more.  Don’t add too many different herbs into a cream as it can cause confusion and they may work against each other.  Keep it simple.  If you want to make a cream for multiple purposes, consider instead making several different creams.

Make sure you strain all of the herb out of the oil and as much of the oil as you can out of the herbs.  Why leave oil behind in your herbs?  Any herbs that end up in your cream can go mouldy.

If you want to make your cream more luxurious, add cocoa butter.  Don’t reduce the amount of wax or your cream won’t set and will have fine hard lumps of wax suspended throughout.

Chop your wax into small pieces before adding to the oil.  This makes it dissolve quicker and the whole mix doesn’t get as hot which saves time beating.

Take your cream off the heat just before all the wax is melted.  It will continue to melt while beating as there is still plenty of heat in the oil and this saves time beating.

When beating, pour it into a glass baking jug first.  This cools the oil and wax quicker and can save you half an hour of beating time.

Finished Product
Don’t spend money buying pots and jars for your creams.  Reuse old plastic spread jars with wide mouths.  The small peanut butter or nutella jars work very well.  Old cosmetic cream pots can be used too.  Alternatively, the cheap little food storage containers that you can buy from the supermarket work very well too.

Make sure your jar or pot is clean and completely dry before pouring your cream into it.  Otherwise it can cause mould in your cream.

Don’t rush to put your lids on.  If the jar and cream are still warm, they can sweat which can cause mould.

Labelling can be awkward.  I’ve found that spirit markers rub off when you have some cream on your hands and are opening or closing a jar.  A piece of paper stuck on with sellotape works.

Cleanup is awful!  The cream will not soak off your pots, jugs and spoons with dishwash and hot water.  It takes a bit of work to clean your utensils - I stick with a spoon rather than a whisk for this reason.  I also wipe everything firmly with paper towels before attempting to wash, the cream seems to stick to the paper quite well and it makes the clean up far easier.

Wednesday 28 November 2012

More Little Piggies


Para and Cricket, our two large white but not piglets were growing well.  They both seemed to be rather daft but Para more so.  Cricket was clearly the dominant one but Para seemed not to mind.

Para and Cricket.
I had someone tell me that I needed to be out with my sunscreen, sunblocking my pigs.  I was skeptical.  They assured me that this is what you have to do with pigs.  I drive past a pig farm at least once a week, I somehow can’t see the farmer out there rubbing his SPF 30+ over his hundreds of sows that are larger than he is.  The friend that we got these two from said that her stepfather sprays used engine oil over his pigs as sunblock.  That was verified by others.  It put me off ever buying supermarket pork again.  I won’t put baby oil on my kids because it’s made from petroleum products, why would I feed it to them?

Another friend grew up on a pig farm.  Her father never did any of these things.  He just made sure that they had shade if they wanted to use it.

A wallow is not just fun for pigs, the mud that they coat themselves in works as a sunblock.  It’s a natural way that pigs do for themselves and they only seem to do it when it’s sunny and they’re in danger of getting burnt.  Well, except for Para.  Para was daft.  He had a lovely nature but was daft.  He wouldn’t roll or play in the wallow and was always dry-skinned, peeling and sunburnt.

I was still determined to have a breeding pair so I started looking for a sow.  I’d decided to keep Para for a boar because he was the nicer natured of the two and would be more manageable when they got big.  Cricket was slated for homekill in four months time. 

Cricket started biting.  It wasn’t vicious, it was more like puppy type behaviour.  I was cleaning up the poo out of their run and he kept nudging me with his nose.  What you doing? Play with me. I’d give him a scratch and carry on, so he bit me on the elbow.  That was blindingly painful, he got me right on the bones that stick out when your elbow is bent.  He bit Miss Fifteen when she was feeding them.  I banned Miss Six from the pigpen.  While he didn’t seem to be nasty, it would still be potentially nasty for her.  If he bit a finger or hand, she’d probably lose it.

In the way of small children, she didn’t listen and got a nasty bite on the thigh. 

I found a Kune Kune sow that was about 3 months old for $50.  Miss Fifteen who had decided the pigs were hers, named her Darla after her boyfriend’s mother (long story).  Darla is a lovely black and white with the tassels that apparently mark her as pure Kune.

We all became a bit afraid of Cricket.  I stopped feeding them in their trough and would just dump the bucket of scraps over the fence.  I would wait until they were eating to sneak around and top up their water every second or third day.

Cricket
One day, I noticed while I was feeding them, that Para hadn’t come running when I called.  I fed the other two and went looking for him.  He was dead in their little house.  Completely cold.  When Hubby came home, he buried him for us.  We weren’t sure why he had died, Hubby said there wasn’t a mark on him but he did notice yellow froth dried around his mouth.  That suggested poisoning to me.  But poisoned by what?

I had a close look around their run and spotted something I hadn’t seen before.  A three foot high Elder tree that had sprung up hidden in the macrocarpa hedge.  With elderberries on it.  Well, they’d do it.  The berries are poisonous until cooked or brewed.

It seemed for all our best laid plans, we might have to keep Cricket if we wanted to breed.  He was certainly trying to do the business, but Darla didn’t seem to be having any of that, not that we saw anyway - she’d lie down when he tried to cover her.

Cricket with Darla when we first got her.
I spent a week picking grapes at a local vineyard and met a local guy who also had pigs.  He wanted an unrelated boar for his sows and we discussed doing a boar swap - that suited me, Cricket was getting to be quite nasty.  I just had to wait for his piglets to get big enough to be weaned.  Another delay, but the results would be worth it.

Then I was feeding the pigs one day and Cricket attacked Darla.  He bit her on the back of her head.  She staggered away, sat down and had a seizure.  I thought I was watching my lovely little sow die.  I rang Hubby in tears.  Then I rang the homekill guy.  He was probably not going to be able to make it for about a week.  I knew that was probably the best I’d get and resolved to try and separate them.

That was a lesson in frustration.  Three hours and I couldn’t get them apart to move her elsewhere.  She was terrified of us all for some reason and when they weren’t eating Cricket was very nice to her.  We were all afraid of him too which didn’t help.

Since the weather was still warm, I stopped feeding them.  There was plenty of grass and he didn’t attack her over grass.  I beat myself up a lot over the whole thing.

The homekill guy rang the next day, he was able to come and do it tomorrow afternoon now, was this okay?  Was it okay?! It was fantastic.

When he was here, he watched Darla for a while.  “She’s blind as a bat mate, should I take her too?”  I watched her run into a fence and saw what he meant.  “Give me a week or so and let me see if she comes right.”  He was dubious but let it pass.

It was heartbreaking.  My sweet natured little sow was terrified of me and of everything.  She’d run into things as she was running away from me.  I wondered if I’d done the right thing.  Within two days however, she was mostly back to herself.  As the swelling went down, her sight returned and she’s back to the sweet pig that I bought months ago.

I waited for four months to see if she was pregnant, but that came and went with no additions to the pig run.  I’ll have to get a boar in for her.  I’ve been advised that Cricket’s behaviour was quite normal, that this is what happens when you keep boars and sows together.  I’ll get another sow for company for her though.

As for Cricket, well, it was nice to take a bite out of him for a change.