Showing posts with label cheesemaking. Show all posts

Thursday, 7 March 2019

Easy Cheesy

There are a few simple and quick cheeses that anyone can make.  Here I've given recipes for my favourite three.

These cheeses don't require culture or specialised equipment, most ingredients are things that can easily be found in the average kitchen.

Be aware that your finished cheese will be about 10% of the milk you start with.  If you start with 2 litres of milk, you can expect approximately 200g of cheese.

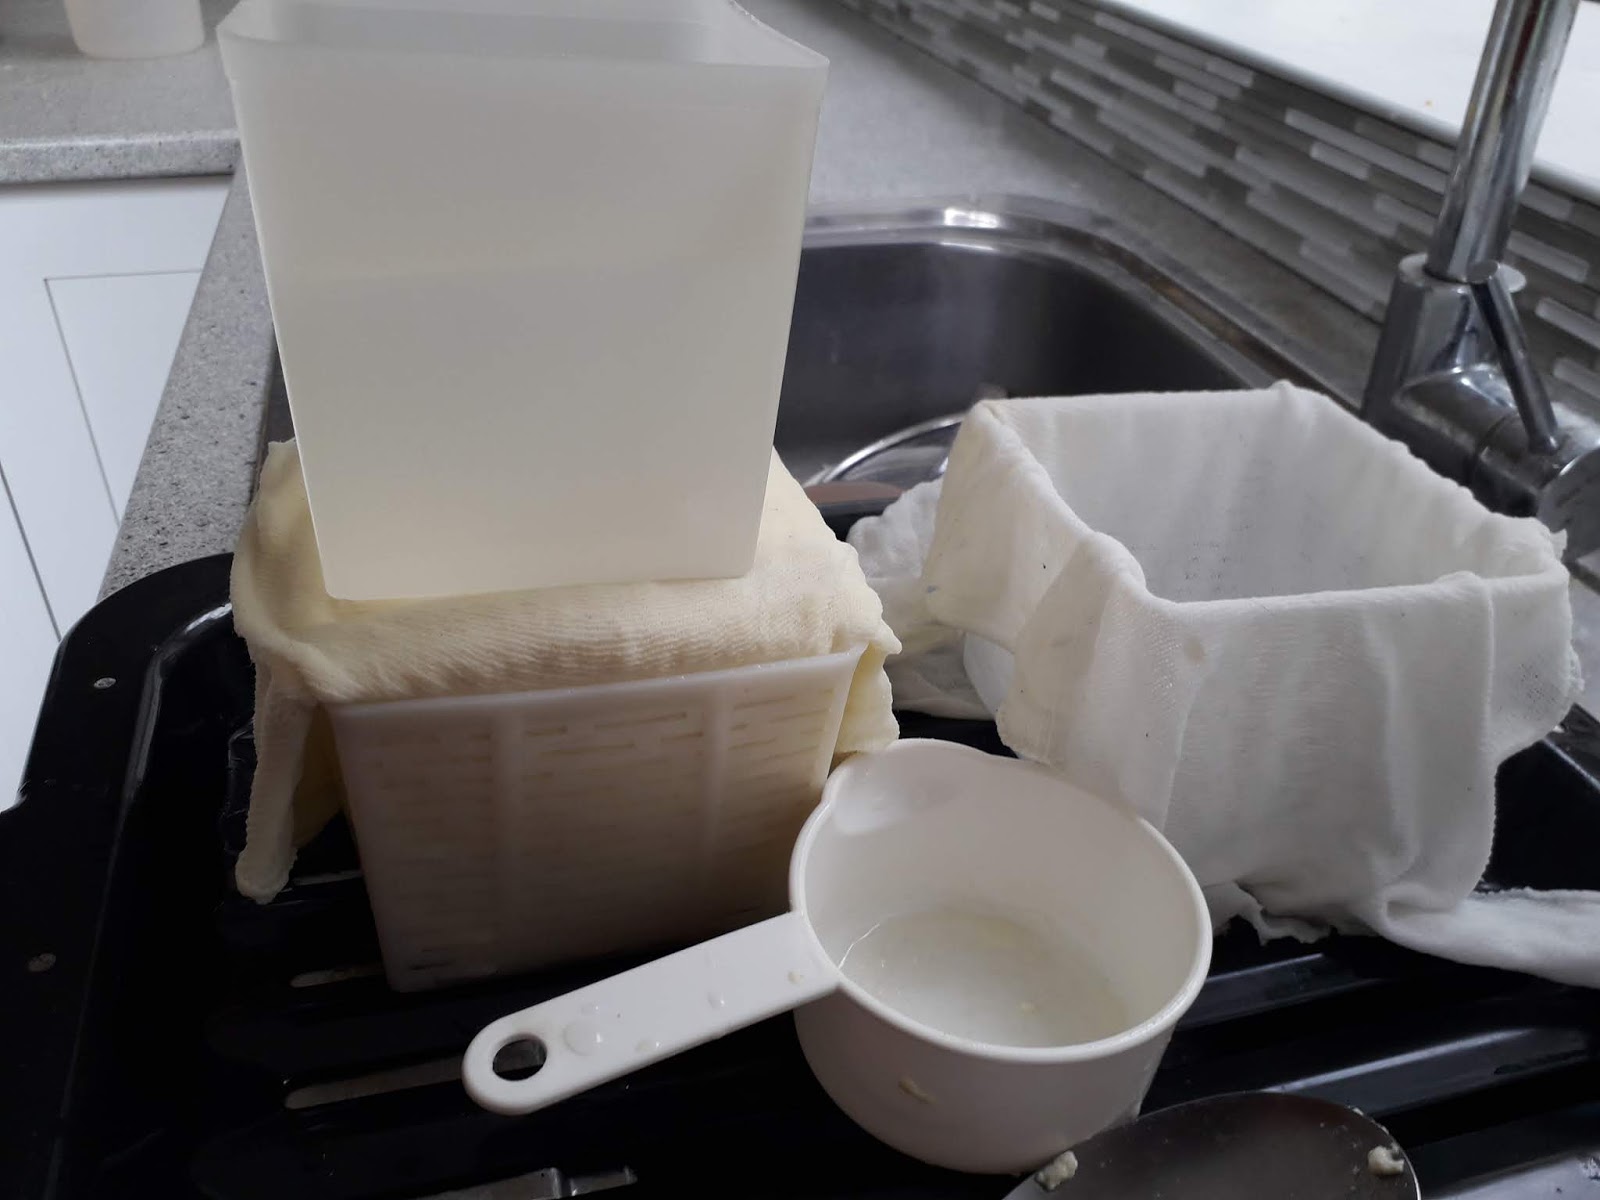
In the first two recipes, the curdled milk should look like this.


Queso Blanco

Queso Blanco is very much like ricotta, in the process and in the finished product.

Bring milk to the boil, stirring to avoid scorching as much as possible.  Very slowly pour in white vinegar, while stirring, until milk curdles and separates.  Make sure that it has separated completely into white fluffy curds and green whey.  If it's just like grainy thick milk, add more vinegar and keep stirring.

Let sit for about two minutes then pour through a cloth lined colander.  Strain until there is no more liquid to come out.

Add salt, garlic and/or olive oil to taste and use like ricotta.
This doesn't keep very well, I'd recommend using it within a week.

Cumin Paneer

I make this one often for my Hindi friends.  I'm told it can be frozen, but I haven't tried freezing it myself.

The recipe I started with said to strain it through a cloth lined colander, twist the cloth around and weight it down.  This made the finished cheese a rounded ball.  My Hindi friends are used to buying it in a square shape, and say this makes it easier to cut into cubes and use.  My solution was to use a cloth to line a feta basket and make cube paneers.

The addition of salt and cumin not only gives this rather bland cheese some flavour, it extends it's keeping time.  This should stay good for about 2 weeks.

My original recipe used lemon juice.  I found myself out of lemons at one point, but my lime tree was so prolific, they were falling all over the ground underneath the tree.  So I tried lime juice and it has worked just as well.

For every 2l of milk, add a tsp of non-iodised salt and a tbsp of cumin seeds.  Bring to the boil gently, stirring constantly to minimise scorching.  Let it boil for 3 minutes before adding lemon or lime juice.  Pour citrus juice in slowly until milk curdles clearly into white fluffy curds and green whey.

Ladle into a cloth lined colander (or cloth lined feta basket).  It may take some time for it all to settle, so be prepared to come back every so often to add more, but try and get it all in while it's still hot.

Fold cloth over and turn upside down in the basket.  If you can find something square to weigh it down, this makes a better, firmer cheese.


Mozzarella

True Mozzarella is made with buffalo milk.  This recipe uses ordinary cows milk.  This recipe also requires liquid rennet.  There are several varieties available in more places than you'd think.  I often buy mine from Bin Inn (various cheese cultures and equipment can also be bought there) but there are plenty of websites that sell rennet fairly cheaply.  Make sure that you are buying either calf rennet or vegetarian rennet and not junket rennet.  Junket rennet is often sweetened although most modern recipes for junket seem to use normal rennet.

I found that mozzarella doesn't keep very well, so I grate it and freeze it in zip lock bags.  This makes it easy to use on pizza and the like.

For every 2l of milk, you will need 1/2 tsp of citric acid.

Dissolve citric acid in 1/4 cup of lukewarm water and stir into milk.  Heat milk to 31 deg C, stirring gently to prevent scorching.

Dilute 1/4 tsp of liquid rennet in 1/4 cup of cool water, add to milk and stir in gently.

Cover and let set for 30 mins.

Check for a clean break.  This means run your knife through the centre of your curd and then either lift the split or pull to one side.  If a clean break has been achieved, the two sides should part easily and hold their shape.  The curd won't be firm, but will hold.  If the curd seems a bit soft or not set, let it sit for another 15 mins.

Using a long bladed knife, cut the curd into half-inch cubes.  I cut front to back and side to side, then turn my knife onto a fairly steep angle and cut the horizontal lines on an angle. I go back and forth with the knife about half an inch deeper down the side each pass.  It doesn't make true cubes, but cuts them into roughly the right size.  I turn the pot and do this four times to be sure I've got them all. Let stand for 5 mins.

Place pot over low heat and slowly bring the curds up to 41 deg C, making sure it takes 20 mins to get there.  The curd will have cooled slightly from it's original temperature, but you're looking at approximately 1 degree raised every two minutes.  Don't let it warm up too quickly. Stir constantly while heating.  Turn off the heat and stir for another 20 mins.  Let stand for 5 mins.

In another pot, bring fresh water to the boil.  At least 2 litres but 4 often works better.  Add non-iodised salt at a rate of 1 1/2 tbsp per litre and stir until dissolved.

Drain whey from curd through a cloth lined colander.  Let the curds drain for 15 mins.

Place curds onto a clean chopping board and cut into 1 inch strips.  Place into a large bowl and pour hot salted water over.

Wearing heat resistant gloves, or using a wooden spoon, work the strips under the water until they become soft and pliable.  Knead, pull, stretch and fold it back on itself.  Keep working until the cheese becomes long and stretchy, it will also become shiny and smooth.  Work all the strips into a single large ball or into small bocconcini sized pieces.

I found another recipe that recommends microwaving the curds in 30 second bursts until an internal temperature of 72 deg C has been reached.  I have used this method and it works, but can be messy and frustrating.

Place the cheese into a bowl of ice water for 5 mins. Drain on a paper towel.

Enjoy simple cheese making!

Monday, 9 November 2015

More Milk and Cheese!

Last week we finally separated Handsome the bull calf from Brownie my house cow.

We'd left him with her to keep him friendly and tame enough until he was castrated, but with one thing and another, we hadn't castrated him yet.  He was 'feeling his oats' and starting to challenge us at every opportunity.  Putting him into a pen at night (so that we could have milk in the morning) had become a dangerous two-person job.

The wonderful neighbour came down to put a ring on him when he was much younger.  At that time, we thought he was friendly enough that he could safely be pinned against the side of the pen by two people while the third did the job.  Unfortunately, while he was friendly for me, he was less familiar with hubby and didn't respond at all well to the neighbour climbing into his pen and managed to make a hole in the fence and ran around our garden.  We discussed running them down into the yards at the neighbours so that he could use the head crusher and do it safely.  But between him working and going away on holiday and us working and having other commitments, we never quite got it done.

Now he's 9 1/2 months old, far too old for a rubber ring and he's a stroppy little gobshite.  So the vet is coming this week to 'cut' him.  That was quite challenging working out when the vet was available, we were available and the neighbour was available to work his challenging crusher.  Meanwhile, I've had enough and we put him into the next paddock over from Brownie.  They spend a lot of time at the gate together.

For the past week we've been serenaded by him, first it was angry calls, then it was sad sounding.  Over the weekend, there were fewer but it just seems like "don't forget I'm here" bellows.


Now that we're not sharing Brownie's milk with him, we're getting twice the volume.  It may have been more but I've decided to stick with once a day milking.  We were getting more than we needed before, so doubling that has meant that I was keeping a bucket in the fridge for the excess once I'd filled the jugs for our use.  We have plenty in the freezer for when we dry her off - although we have to get her in calf again first for that - so there's no need for more to freeze.

I spent the weekend cheese making.  I've made cheese in greater quantities than previously and different varieties that I hadn't tried before.  Instead of my usual 4 litres of milk to make two blocks of feta, I used 8 litres and made four blocks.  Two have been given away to people who like my feta and two are currently in the fridge.

I was also given a lot of frozen cream.  Miss Nineteen's boyfriend works in a petrol station and brings home the cream that doesn't sell, which goes into my friend's freezer (Miss Nineteen boards with one of my friends).  She gave me a bag with about 8 litres of frozen cream in the usual 300ml and 600ml bottles.  I thawed some of the cream out and tried my hand at making cream cheese.

I don't know if it was because it had been frozen but the cream and milk mixture was a little grainy even before I added culture and rennet and the resulting cream cheese is a little grainy and not the smooth spread that you buy from the supermarket.  However it tastes great.  Next up, I'll be trying some of the flavoured cream cheeses that you can buy for cheese boards.


My grainy but tasty cream cheese.

I also made a real cheddar for the first time yesterday.  I've previously made a farmhouse cheddar which didn't involve the proper cheddaring procedures, so I wasn't really prepared for how labour intensive cheddar is and how long it takes to make.  I'd thought it would be like most cheeses, a couple of hours and it's in the press.  This required an hour of turning the cheese every ten minutes to condense it into a brick-like mass before cutting it into fingers.

I liked the thought of a port cheddar, but lacking port, I used the elderberry wine that I had in the barrel waiting for me to bottle.  It's sweet and smoky and has distinct port-like qualities so I've used that.

Elderberry wine cheddar.


One of the issues we've been running into is making Edam cheeses the way I usually do, I end up with a 1.2kg block and now there's only three of us at home, it takes forever to get through it all. Making it in smaller quantities meant that it didn't press as well and I was running out of blocks for my cheese press.  So instead I decided to make it in the same usual quantities, but just before the brining and drying part of the process, I would cut my cheese into smaller pieces.  Let them brine and dry that way and wax them separately.  I'm going to do this with the cheddar.

The added bonus to doing it that way is that a smaller wedge could make a nice gift too.

Thursday, 11 June 2015

Some Thoughts on Cheese Making

Again today, I'm in the process of making cheese.  This time I'm having a go at Edam - it's currently setting after the addition of the rennet.

It struck me today that the really hard part about trying new cheeses is that they take months to cure.  I like to know the success or taste of a cheese before I attempt to make another one.  If the recipe I've used is not right, or something was lost in translation (translation from cheese-making jargon to what I understand).  I'd prefer to know about it before I charge on in potentially making the same mistakes over and over and having a shelf full of cheeses (this represents hours and hours of work and plenty of milk) that are only good for the pigs.

My last batch of Camembert was a disaster.  I'd been getting rather hard crumbly Camemberts but they were still completely edible, you could slice it and eat it just fine on a cracker.  I did some research and wondered if I'd been a bit rough with my curd.  So for the last batch I was extremely gentle.  The curds didn't look like cottage cheese this time, they held their mostly cube shapes.  But it was harder than ever.  you can't safely slice this batch.  I've taken to grating it with a lemon zester and using it in potato bakes where I might have used parmesan.  It's worked okay, but it is frustrating.

Camembert only cures for a month!  Today's Edam will need to wait for two months before I know if it's any good.

I've been making different types of hard cheeses so I'll have a variety to try and decide whether or not to make again.  Currently curing is Gouda and a Farm Cheddar.  Actually, I think they're both up for tasting in the next couple of weeks.

Another thought is that many of the recipes available are not really designed for the home cheesemaker.  The smallest quantity of milk I've found in these recipes is 4 litres.  Most are approximately 10 litres and I've found a few that are 20+.  Four litres is manageable.  Ten litres is easy to work out reduced amounts and conversions.

Ten litres isn't entirely practical unless you go and buy special equipment for cheesemaking.  I've taken to sterilising a large bucket and using that.  Otherwise I have one large stockpot that will only barely hold ten litres and a large bowl that isn't really big enough for all the whey.

A further thought is that it really is quite incredible how a small difference in process can make such a different cheese.  I've made feta, minas, camembert, gouda, edam, cheddar, mozzarella and ricotta.  With the exception of mozzarella and ricotta, most of the cheesemaking process has only small variations in what you do to create such vastly different cheeses.  They use the same cultures (I only have two cultures) and the same volume of rennet.  Camembert has Penicillum Candidum added.  The time left to set, whether or not it's then heated in whey and whether it's pressed are the main differences and then how long it's left to age.

It's a journey anyway and one I'm having fun with.


Tuesday, 19 May 2015

Cheese Making

Now I have the milking machine up and running, I have plenty of milk, gained far quicker and more easily.  What had been taking me at least half an hour now takes approximately 15 minutes including the time spent moving Brownie in and out of the shed and cleaning the milking machine.

Brownie on the milking machine
While we're still not getting lots, we're getting excess to our milk drinking requirements.  I have enough left over that I have been experimenting with different cheeses.

I currently have two Gouda cheeses maturing, a Cheddar drying before waxing and Minas in the fridge.  I also have a complete failure of two Camembert wheels.  They won't be wasted, they may be hard as wood, but will still double for Parmesan in most things.


Two waxed Goudas maturing

Farmhouse Cheddar drying

The Minas Cheese came as a request from a workmate of Hubby's.  She's Brazilian and finds it hard to find Minas in NZ and had been missing it greatly.  She raves over just how yummy it is.

I went searching for recipes.  I found plenty of history on the Minas cheesemaking region in Brazil.  I found discussion on the composition (in chemical terms) of Minas and how it's texture differs from other cheeses.  I found recipes in Portugese with no translation.  I really struggled to find a recipe.

The workmate offered to translate recipes into English for me and also said she'd ring her Sister-in-law in Brazil and get her recipe because the SIL has a small farm and makes her own.  Then I found a blog with a video of someone making Minas.  Every so often, the video stops and there are instructions in English come up as text, so I copied it down and then made it into more readable English.

I reduced the volume by 80% and made Minas cheese.  It's a fresh cheese, rather roughly handled throughout (which surprised me) and is simple to make.  I sent a small wheel into work with Hubby the next day and waited for the response. 

About halfway through the day, I decided to try some.  I found it bland and almost tasteless although the silky texture was nice.  By the time Hubby got home, I was convinced I'd made the wrong thing.  This couldn't possibly be the same cheese she'd been describing as SO yummy.

I said as much to Hubby.  He raised an eyebrow and then showed me the text message he'd just received.  It was the workmate gushing gratitude and exclaiming over how yummy my Minas was.  I wondered if perhaps there was something wrong with my palate and so I cut a slice for Hubby.  He frowned and said the same as I had, but different cultures and different tastes and all that.

Anyway, here is the recipe I used.  The original called for 18 litres of whole milk to make 3 1kg cheeses.  I've reduced it somewhat.

Minas Cheese


3.6 litres whole milk
2 ml rennet
30g salt

If it is cold weather, have 1 l boiled water ready for when you break the paste.

Add rennet to milk and stir it well.  (The original called for a wooden spoon that is only used for making Minas).

Add salt and mix well.

Cover and leave for 2 hours.

Break up to separate curds and whey.  There was no mention of any size cubes to be cut, just break it up.  This is where you can add the boiled water which can also make a firmer cheese.  Strain out the curds and press (with hands) into cheese molds.  Press it down firmly to remove as much whey as possible.

After about half an hour, flip the cheese mold over and repeat after another half hour.


Monday, 14 January 2013

Making Cheese


My best friend gave me a cheese making kit for Christmas!  She sent me the Camembert kit from CottageCrafts.  The kit contained:

2 Camembert hoops
2 pieces of cheesecloth
A 3ml pipette
Camembert starter culture
P. Candidum culture
A cooking thermometer with clip
Vegetable rennet
Wraps for camembert
Instruction booklet (includes a couple of other cheeses)
Iodine based solution for sterilisation with its own pipette

I read through the instructions and saw that it takes a month to cure so instead of having some camembert ready for her visit for New Years (she lives in Australia), I decided to make it with her when she came to stay with us.  We waited until the New Year’s party (a large regular event for us) was over and done with and we were all sufficiently recovered from it. 

She was quite surprised when I said I hadn’t watched any of the cheese-making clips on youtube, I’d just read a few instructional books and articles.  I’m glad that she had watched these clips - some parts of the process, I think, are easier when you’ve seen how others do it and there were a few times when I wasn’t sure if it was supposed to look like that.

Camembert

4 litres of milk was raised to 32 deg Celsius and 1/16th of a tsp of starter culture and the tip of a pointy knife of P. Candidum culture added.  The tip of a pointy knife wouldn’t fit inside the small tube, so it became the tip of a bamboo skewer twice. Left to sit for 30 mins.

2ml of rennet in 20 mls of cooled boiled water was added and it was left to sit for another 45 mins. Fortunately, through watching the youtube clips, my friend was able to tell me when it was ready - when it’s set, a cut will make a ‘clean break’ and separate.  Cut the curd into 2cm cubes.  Again the youtube clips helped - cutting down in two ways in a 10 litre stock pot (up and down and sideways) was easy, but how to do the cuts through the depth? I had thought I’d be turning it out onto a board and cutting it (yeah, that would never have worked). The trick to it is to angle your knife and make cuts from the top to the side of the pot, going around in quarters.  Difficult to describe, but simple if you see it done.  While the recipes all say cubes, they’re never perfect, even cubes.  Let sit for 5 mins.

Turn the curds.  Well, the top layers were nice cubes but at the bottom it was a bit different.  Here’s where I was looking at it wondering if I’d done it wrong.  Underneath, the stuff that was coming on top with the turning looked more like watery cottage cheese.  But this is fine.

Curds turned twice more at 10 minute intervals.  Drain off a third of the whey and replace with the same amount of cooled boiled water.  Draining off the whey wasn’t as easy as it sounded.  We poured cupfuls through cheesecloth and returned the curds caught in the cloth to the pot.

Turn the curds twice more at 10 minute intervals.  Drain off half the whey and ladle curds into the sterilised hoops.  The recipe said to have the hoops sitting on a draining tray covered with a sushi mat and then cheesecloth.  We weren’t quite sure what we were going to use for this, I don’t have sushi mats for a start.  My dehydrator trays worked brilliantly and I have a large bowl that the tray was able to sit over.  The curds filled the two hoops, looking somewhat like cottage cheese at this point.
After nearly a day in the hoops

The curd filled hoops are inverted at intervals, using another cloth lined tray and left overnight - basically to roughly 24 hours after starting. Then removed from hoops and soaked in a 20% brine mixture for an hour.  Here’s another point where we stopped.  20% brine?  1 cup of salt to 1 litre of water.

Dry cheese on a rack for another 24 hours.  Then stored for 10 days to ripen at 11-15 degrees. The cheese needs to be turned every two or three days. I figure that our little scullery room that doesn’t get any direct sunlight should work for this.  The hard part will be keeping it safe from flies and dust but still able to let the air at it.  Then wrapped in foil (the wraps that came with the pack) and stored for another week at 11-15 degrees.  Ready to eat after three to four weeks.  We haven’t gotten to this part yet, we’ve only just brined the cheese.  I will do an update when we have.  I am enjoying watching a large amount of milk turn into two small cheeses though.

Hubby looked at our two small hoops filled with curds and asked how much milk had gone into it.  Disbelief was expressed (and not politely) and costs were questioned - whether this was cheaper than just buying camembert.  So we did the maths.  That day, I’d bought two small camembert wheels - $4 each for 110g cheeses.  This kit was supposed to make two 250g cheeses - so we were looking at $16 (plus some) worth of cheese.  Two litres of milk is somewhere between $3.50 and $4.50 depending on where you buy it, so we were clearly making a saving.  He was content with that.


Some of the whey
We had saved all the whey that we’d drained off.  There was a ricotta recipe that uses whey in the instruction booklet and I’d recently seen an article in the December 2012 issue of the Lifestyle Block magazine that had uses for whey.  One said to use the whey within one hour of draining it off and the other said within two hours, so once we’d poured the curds into the hoops I started to heat the 2 1/2 litres of whey that we already had.

Ricotta

Once the whey had reached approx 60 degrees celsius, we added milk and salt - the recipes vary a little here.  One had 5 litres of whey, two cups of milk and 1 tsp of salt.  The other didn’t specify how much whey, only one cup of milk and no salt.

Ricotta hanging
We heated the whey up to 95 and added diluted vinegar (40ml vinegar in 200ml water).  Both recipes mentioned white vinegar, but I had none of this.  A little time spent on Google told us that many cheese makers use apple cider vinegar with no noticeable difference to the cheese, so that was what we used.  As soon as the curd starts forming stop adding vinegar.  Let it sit for five minutes and put into a colander lined with cheese cloth.  The youtube clips came in handy here too.  Different from both recipes was to hang the cloth to let it all drain properly.

We still had some whey left over so I wanted to try something else I’d seen in the magazine article. 

Gjetost (also known as Mysost)

Gjetost is a Norwegian sweet cheese - pronounced Yay-toast according to one of the websites we went looking at this morning.

Basically this is made by simmering the whey down to a fudge-like consistency and pouring it into a greased pan (like fudge) and cooling quickly.  As I write this, I’ve started simmering the whey.  I may even do this one twice - once with the whey that has come straight from the camembert and once with the leftover whey from making ricotta - whey from whey cheese.  I don’t know if the whey from the ricotta will be useful, but I’d rather try it and find out than tip it down the sink.

My first batch of Gjetost is done.  One litre of whey makes about half a cup of this.  Mine didn’t brown and I’m wondering if I took it off too early.  I was just a little disturbed when there was no liquid left in the pan and just some slightly off-white stuff - looked more like coconut ice than fudge to be honest.  It tastes similar at the moment to Barfi(sp) a Hindi sweet treat I was given a few times at Diwali.  Actually, if I recall correctly, Barfi is made from milk and sugar.  This lacks the aftertaste I’m guessing whatever causes this went into the curds.

Some discussion and thought has raised the suggestion that I didn’t actually simmer it.  I kept it on a very low setting and didn’t see any bubbles rising at all.  We’ve turned the heat up on the second batch to see if it makes a difference.  We also looked on some cheese making forums and found quite a useful discussion on gjetost.  In this forum, someone said that the only reason you don’t boil it is that it will make it scorch.

Second batch was no good.  This was using the leftover whey after making ricotta.  Two litres simmered down without thickening or going brown and when my back was turned for only five minutes it burned.

We’re also wondering if the problem came from having left the whey overnight before making the gjetost.  Perhaps it should have been made immediately like the ricotta.

We ran out of cheese cloths, with so many things going at once so a new unopened packet of chux-style cloths came out.  I’ve used these for straining all sorts of things and find that as long as they’re new and haven’t been used for anything else, they’re great.  After straining a jelly or in this case cheese through them, they can be washed and used for cleaning.