Showing posts with label crochet patterns. Show all posts

Friday, 15 February 2019

Homespun Blankets

My sheep have mostly come from Texel stock.  Texel wool is not as fine and soft as most wool breeds, in fact, Texels are mostly considered a meat breed and their wool is not valued.

I refuse to let this mean that a large portion of the wool from my sheep is no good for anything.  I'm stubborn like that.  I had made socks from my homespun wool, they were stiff and a little scratchy, so I wasn't going to even think about knitting a jersey from it.  Although, I have learned that using bigger needles makes them less stiff and I have knitted jerseys from some of the softer, finer wool.  I started thinking about what I could make with all of this wool that wouldn't necessarily be next to the skin.

I found tutorials online for Corner to Corner (often abbreviated to C2C) crochet.  They sit nice and flat, much better than a Granny Square blanket.  The edges stay straight and even, much better than any other type of crochet I've ever tried.  They work up easily and can safely be stopped and put aside in the middle of a row as they don't require any/much counting.

I noticed, rewatching the tutorial that I've linked to, I do them slightly differently.  I use trebles rather than doubles, but I start with the same chain of six and use the same chain of three when I start a new cluster.

I made a blanket or bedspread for my bed.  We have a King Size bed.  I tried to work it out as approximately 3m sq to allow for the blanket to hang over the sides and foot, but this has come out somewhat bigger than that.


It was a wonderful thing to work on over winter.  Especially once I reached a point that it could cover my feet.  The down side was it was huge and heavy and turning it over to do the next row required standing up and juggling several balls of wool and often, shifting the cats who loved it too.

Those are my feet underneath - I had the foot rest up on the lazyboy.

It's a great blanket on our bed in winter.  It's heavy and warm.  It's now the only blanket we add to our bed for the changing season.

Very quickly, my children wanted one each too.  I vowed and declared that I would NOT be doing another one all in one piece, so I made one in squares that I joined with separate stripes.
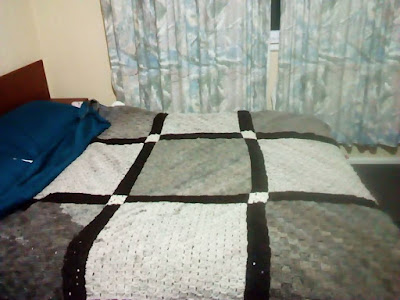
Queen sized bed.

Making this one, I learned just how much I really hate sewing pieces together and trying to match up the patterns between them.

So for the one I made for my son and daughter-in-law, I chose to compromise.  This was made in four full length panels.


This allowed for some fun reversing of direction up the middle, which they both loved.

I have also made a smaller blanket out of acrylic yarns for my Granddaughter, but I can't seem to find a good photo of it - I'll provide one when I can.

Next on the list is one for my oldest daughter and son-in-law and then another for the grandchild on the way.

Each one takes months to make. They weigh at least 5 kg and use approximately two whole fleeces each.

We love them.

Thursday, 21 May 2015

Knitting Needle and Crochet Hook Conversion Charts

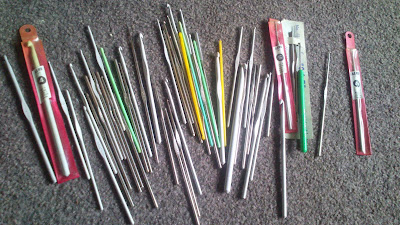
A while back I wrote about inheriting boxes filled with Grandma's craft stuff.  I have more knitting needles and crochet hooks now than I think any one sane person should own, but I can't quite make myself give any away or sell the clearly vintage hooks.

This isn't all of them.


The challenge comes from trying to understand exactly what size some of them are.  This gets worse with some of the hooks when their marked with a 5 and seem to be about 5mm.  Actually, they're a UK size 5 hook which is really 5.5mm.

Fortunately for me, I also got this wee gadget that is especially helpful with sock needles that have no markings whatsoever.

Metric side

UK side

For everything else, there are these charts below.  I thought them worth sharing because sometimes I can't remember if it's a 10 or 11 needle I need right now and it's difficult to tell the difference with the naked eye.

Knitting Needle Conversion Chart


Metric (mm)
US    
UK & Canadian
2.0
0
14
2.25
1
13
2.75
2
12
3.0
-
11
3.25
3
10
3.5
4
-
3.75
5
9
4.0
6
8
4.5
7
7
5.0
8
6
5.5
9
5
6.0
10
4
6.5
10 1/2
3
7.0
-
2
7.5
-
1
8.0
11
0
9.0
13
00
10.0
15
000
12.0
17
-
16.0
19
-
19.0
35
-
25.0
50
-


Crochet Hook Conversion Chart


Metric (mm)
US
UK & Canadian  
2.0
-
14
2.25
B/1
13
2.5
-
12
2.75
C/2
-
3.0
-
11
3.25
D/3
10
3.5
E/4
9
3.75
F/5
-
4.0
G/6
8
4.5
7
7
5.0
H/8
6
5.5
I/9
5
6.0
J/10
4
6.5
K/10 1/2
3
7.0
-
2
8.0
L/11
0
9.0
M/13
00
10.0
N/15
000

Wednesday, 21 May 2014

Crochet Easter Bunnies


These cute little bunnies stand 10cm (4 inches) tall when made with DK yarn and a 4.0 mm hook.  I'm considering trying one with two strands and a 6.5 mm hook.

I'm using American terminology in this pattern.  Most of the pieces are worked in rounds, spiraled so that there is no joining at the end of each round, you just work on top of the first stitch of the previous round.  For the Body, Basket and Arms, I carry my start tail with the work and weave them in as I work.  For the other parts, the tails are needed for attaching the different parts - well, not so much with the ears, but it's difficult to carry the tail in the work for them.

Body and Head (Make 1)

For some reason loading this pic keeps rotating it.  Sorry it's upside down.
Round 1: Start with a magic ring, sc 6 into the ring. 
Round 2: Sc2 into each st (12 sts).
Round 3: (Sc 1, sc2 into next st).  Repeat for entire round (18 sts).
Round 4: (Sc1 into next 2 sts, sc2 into next st).  Repeat for entire round (24 sts).
Round 5 - 9: Sc in each st.
Round 10: (Sc1 into next 2 sts, sc2 together). Repeat for entire round (18 sts).

At this point, I find it easiest to stuff the body - not too tight.

Round 11: (Sc1, sc2 together). Repeat for entire round (12 sts).
Round 12: Sc2 together for entire round (6 sts).
Round 13: Sc in each st.
Round 14: Sc2 into each st (12 sts).
Round 15: (Sc 1, sc2 into next st).  Repeat for entire round (18 sts).
Round 16 - 18: Sc in each st.

Lightly stuff head.

Round 17:  (Sc1, sc2 together). Repeat for entire round (12 sts).
Round 18:  Sc2 together for entire round (6 sts).

Fasten off leaving long tail.  I like to use my yarn tail to stitch around the hole and pull up a little tighter.


Feet (Make 2)

Chain 6, join into a ring with first sc of next round.
Round 2 - 4: Sc into each st.
Round 5: Sc2 into first 3 sts, sc into next 3 sts (9 sts).
Round 6 - 7: Sc into each st.
Round 8: Sc2 together 3 times, sc into next 3 sts (6 sts).

 Fasten off, leaving long tail and stuff very lightly.  These feet look a little clumsy to begin with, but when sewn up and sewn to body seem to work quite nicely.

Arms (Make 2)


Chain 6, join into a ring with first sc of next round.
Round 2 - 4: Sc into each st.
From here, we change to rows.
Push hook through next st and through last st and sc the two sides together.  Do this twice more to make 3 sts on the row and single thickness.
Work 3 rows in sc.
Next row: Ch 1 (turning chain from previous row), sc 2 together (2 sts).
Work one row.

Fasten off leaving long tail.


Ears (Make 1)

Ch 6, turn and sc into 3rd ch from hook, sc 3.
Ch 1 and turn.  Sc 3, hdc2 and dc3 into next st.  Dc3 and hdc2 into next st. Sc 4.

Ch 8, turn and sc into 3rd ch from hook, sc 3.
Ch 1 and turn.  Sc 3, hdc2 and dc3 into next st.  Dc3 and hdc2 into next st. Sc 4.

Fasten off.


Basket (Make 1)

Round 1: Start with a magic ring, sc 6 into the ring. 
Round 2: Sc2 into each st (12 sts).
Round 3: (Sc 1, sc2 into next st).  Repeat for entire round (18 sts).
Round 4: (Sc1 into next 2 sts, sc2 into next st).  Repeat for entire round (24 sts).
Round 5 - 9: Sc in each st.

Fasten off leaving long tail.

To Make Up:

Stitch toe end of feet.  Run thread through foot and stitch in place to underside of body.


Stitch basket down the belly of the bunny and along both feet (as shown).


Stitch arms to body and to basket.


Stitch ears together - I go up about 2 sts.  Weave a line of stitching through the base of the ears and pull to gather lightly.  If you wish, you can also run a little yarn partway up one ear and pull to give the ear a slightly lopsided look.  Stitch ears to top of head.


Find spot for tail, sc 3 and use tail of yarn to loosely stitch it into shape.


Sew on eyes and nose.  For the nose, I've been doing one full stitch with long tails, then I tie a reef knot and sew the tails through the head.


Add an easter egg :)

If you try this pattern and something doesn't work - please let me know.  I've just been making these purely on improvisation and while I think I've worked the pattern out right, I may have made a mistake or 3.